ChromeOS
A step-by-step guide for setting up TelemetryTV on ChromeOS
TelemetryTV Guide for Chrome Digital Signage Players
Introduction
This guide simplifies the process of setting up and managing Chrome digital signage players with TelemetryTV. It is tailored for IT administrators, users, and programmers.
ChromeOS Version Support
- Current Version Support: TelemetryTV supports the current stable version of ChromeOS and the version immediately preceding it.
- Version Check: Confirm the current stable version of ChromeOS here.
- Support Limitation: TelemetryTV focuses on troubleshooting related to the TelemetryTV Media Player. Issues specific to ChromeOS are not within our support scope.
ChromeOS apps are being deprecated. You will soon need to use Progressive Web Applications (PWAs).
Some functionality, such as serial interfaces, may be lost as Google has not provided equivalent features in PWAs.
Our recommended alternative is switching to TelemetryTV Box OSfor better stability, performance, lower cost, and long-term support.
Recommended Device
- See our recommended hardware list here.
Advantages of Chrome Digital Signage Players
- Ease of Deployment: Ideal for large-scale setups with automatic provisioning through Chrome Device Management.
- Cost-Effectiveness: Most budget-friendly option for large-scale deployments.
Disadvantages
- Initial Setup Complexity: Can be challenging to set up initially.
- Limited ChromeOS Device Support: Support for ChromeOS devices is limited outside the USA.
Required Software
- Chrome Device Management: Long-term use requires provisioning through Chrome Device Management.
- Google Enterprise License: Purchase a Google Enterprise license for each device (annual fee of $50 USD).
Testing ChromeOS Digital Signage Players
Update Your Chrome Device
- Turn on your device.
- Navigate to:
chrome://settings/helpin your browser. - Update: Click "Update Google Chrome" if available.
- Relaunch: Click "Relaunch."
Pairing for Testing
- Turn on your device.
- Install TelemetryTV: Search and install the media player.
- Pairing Code: Note the pairing code displayed by the media player.
- Complete Pairing: On your computer, navigate to "Devices" in TelemetryTV, click "Pair," and enter the code.
Note: Pairing is for testing purposes. For long-term use, follow the setup instructions for automatic provisioning.
Setting Up ChromeOS Digital Signage Players
Part 1: Chrome Enrollment and Setup
- Update ChromeOS: Follow the steps in the "Update Your Chrome Device" section.
- Purchase Google Enterprise Licenses: Required for each Chrome device used with TelemetryTV. Visit the Chrome Enterprise website for more details.
- Enroll Your Devices: Follow Google Enterprise instructions to enroll your devices.
Part 2: Provisioning the TelemetryTV Media Player App
2.1: Add TelemetryTV to Your Google Admin Site
- Login to Google Admin: Visit Google Admin and log in.
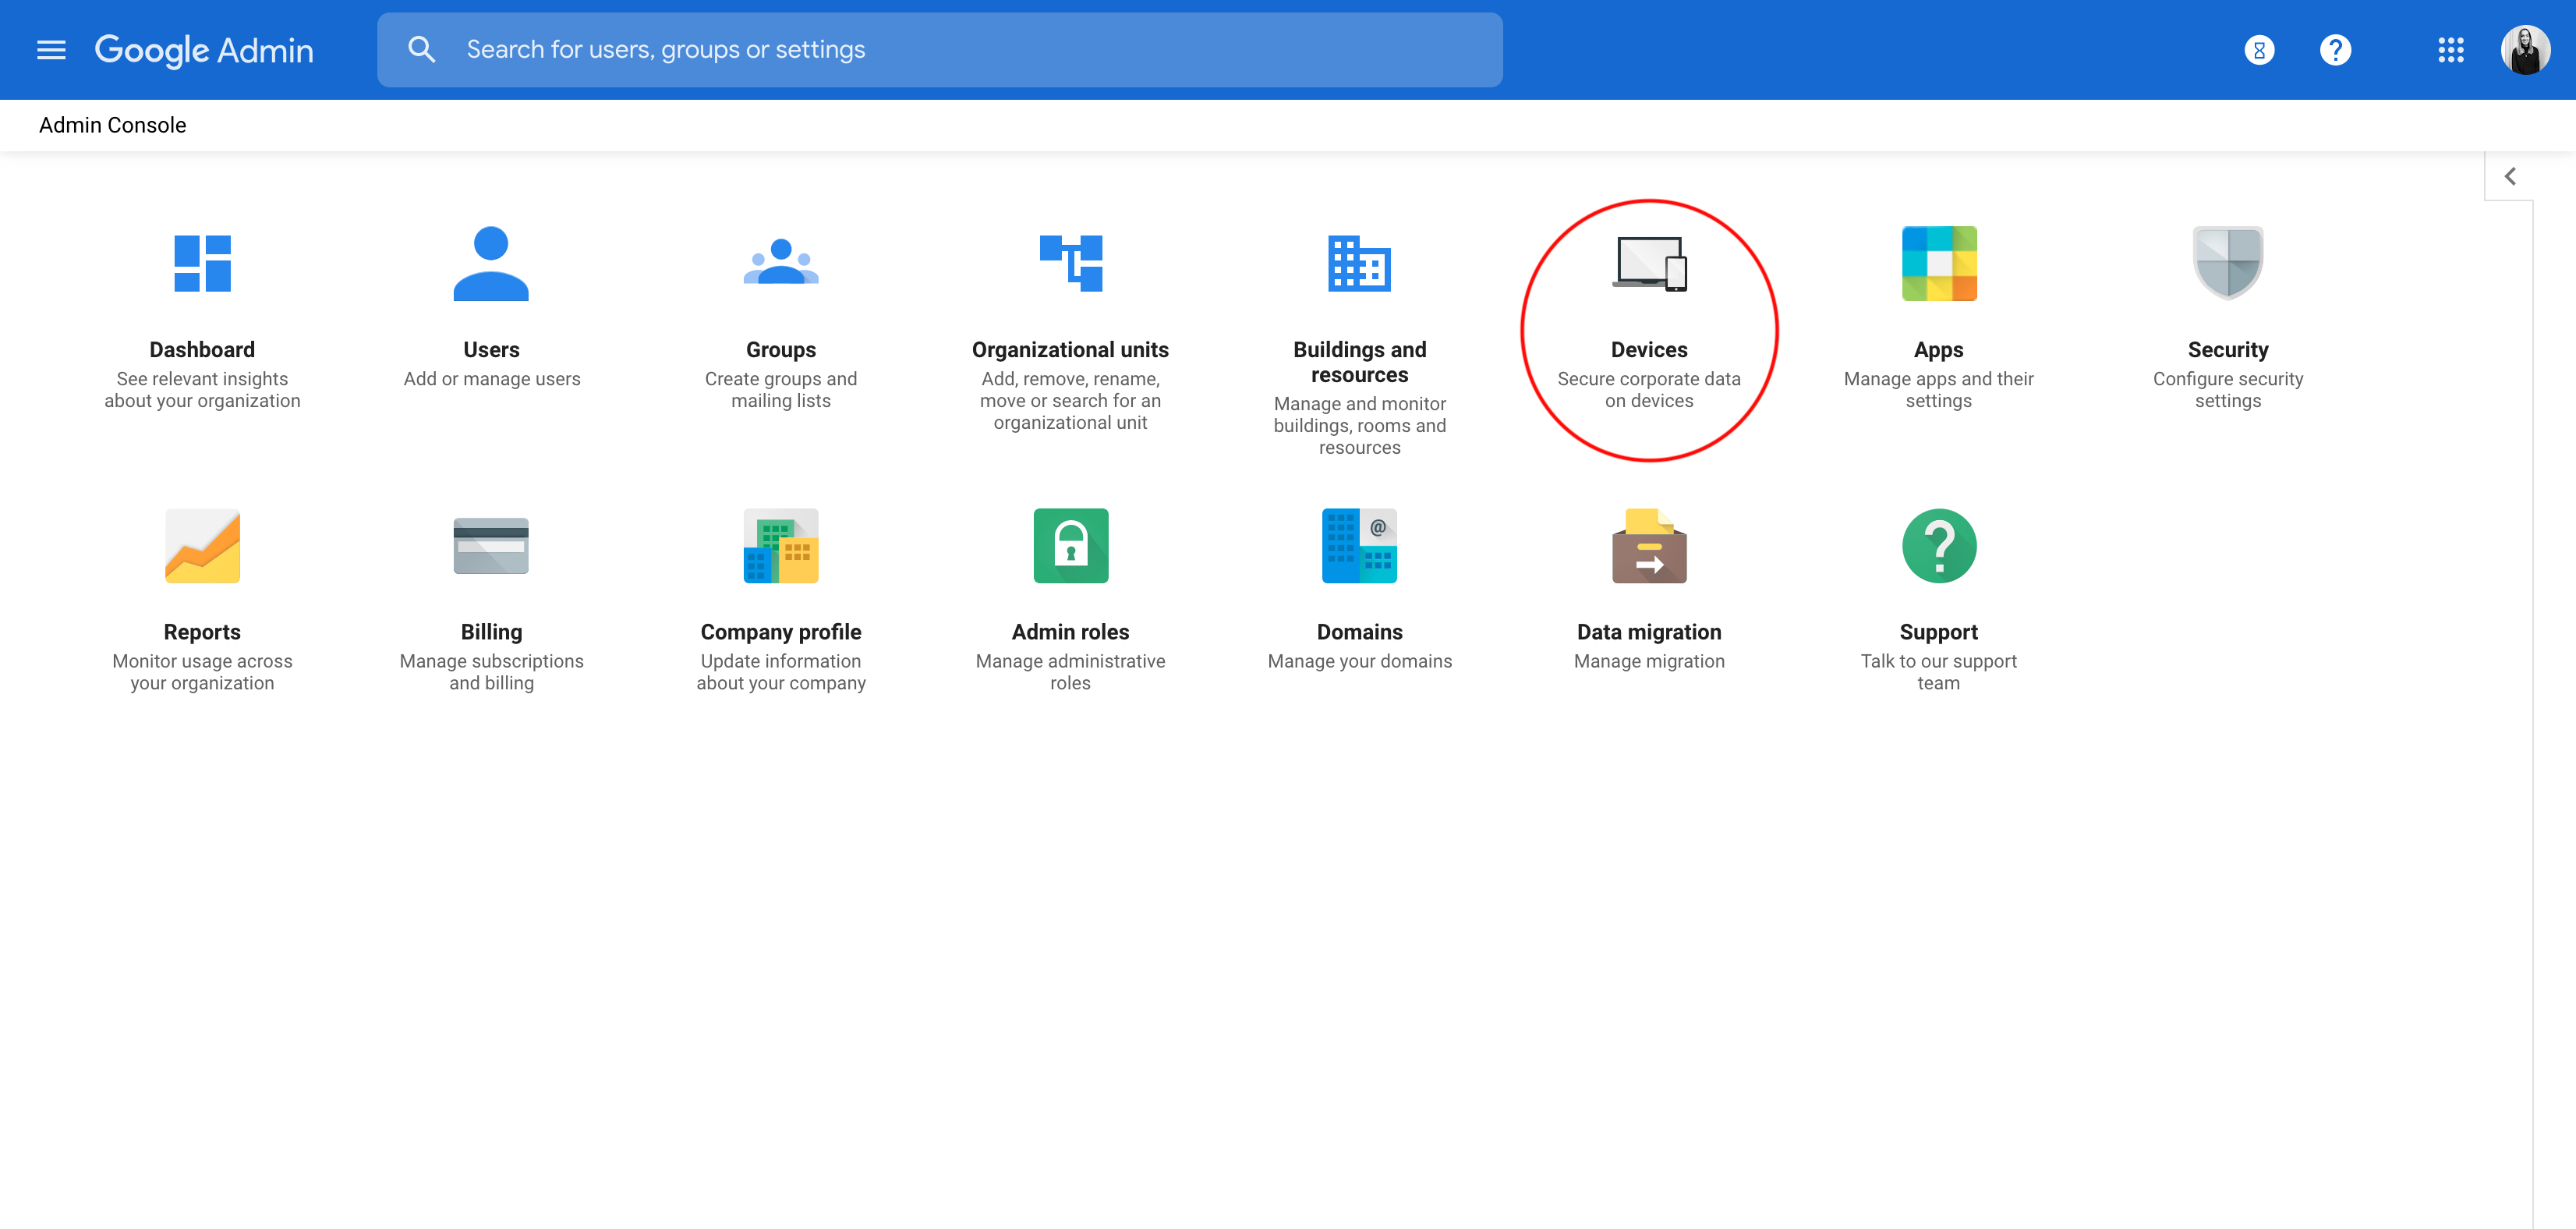
- Navigate to Apps & Extensions:
- Click
Device Management.
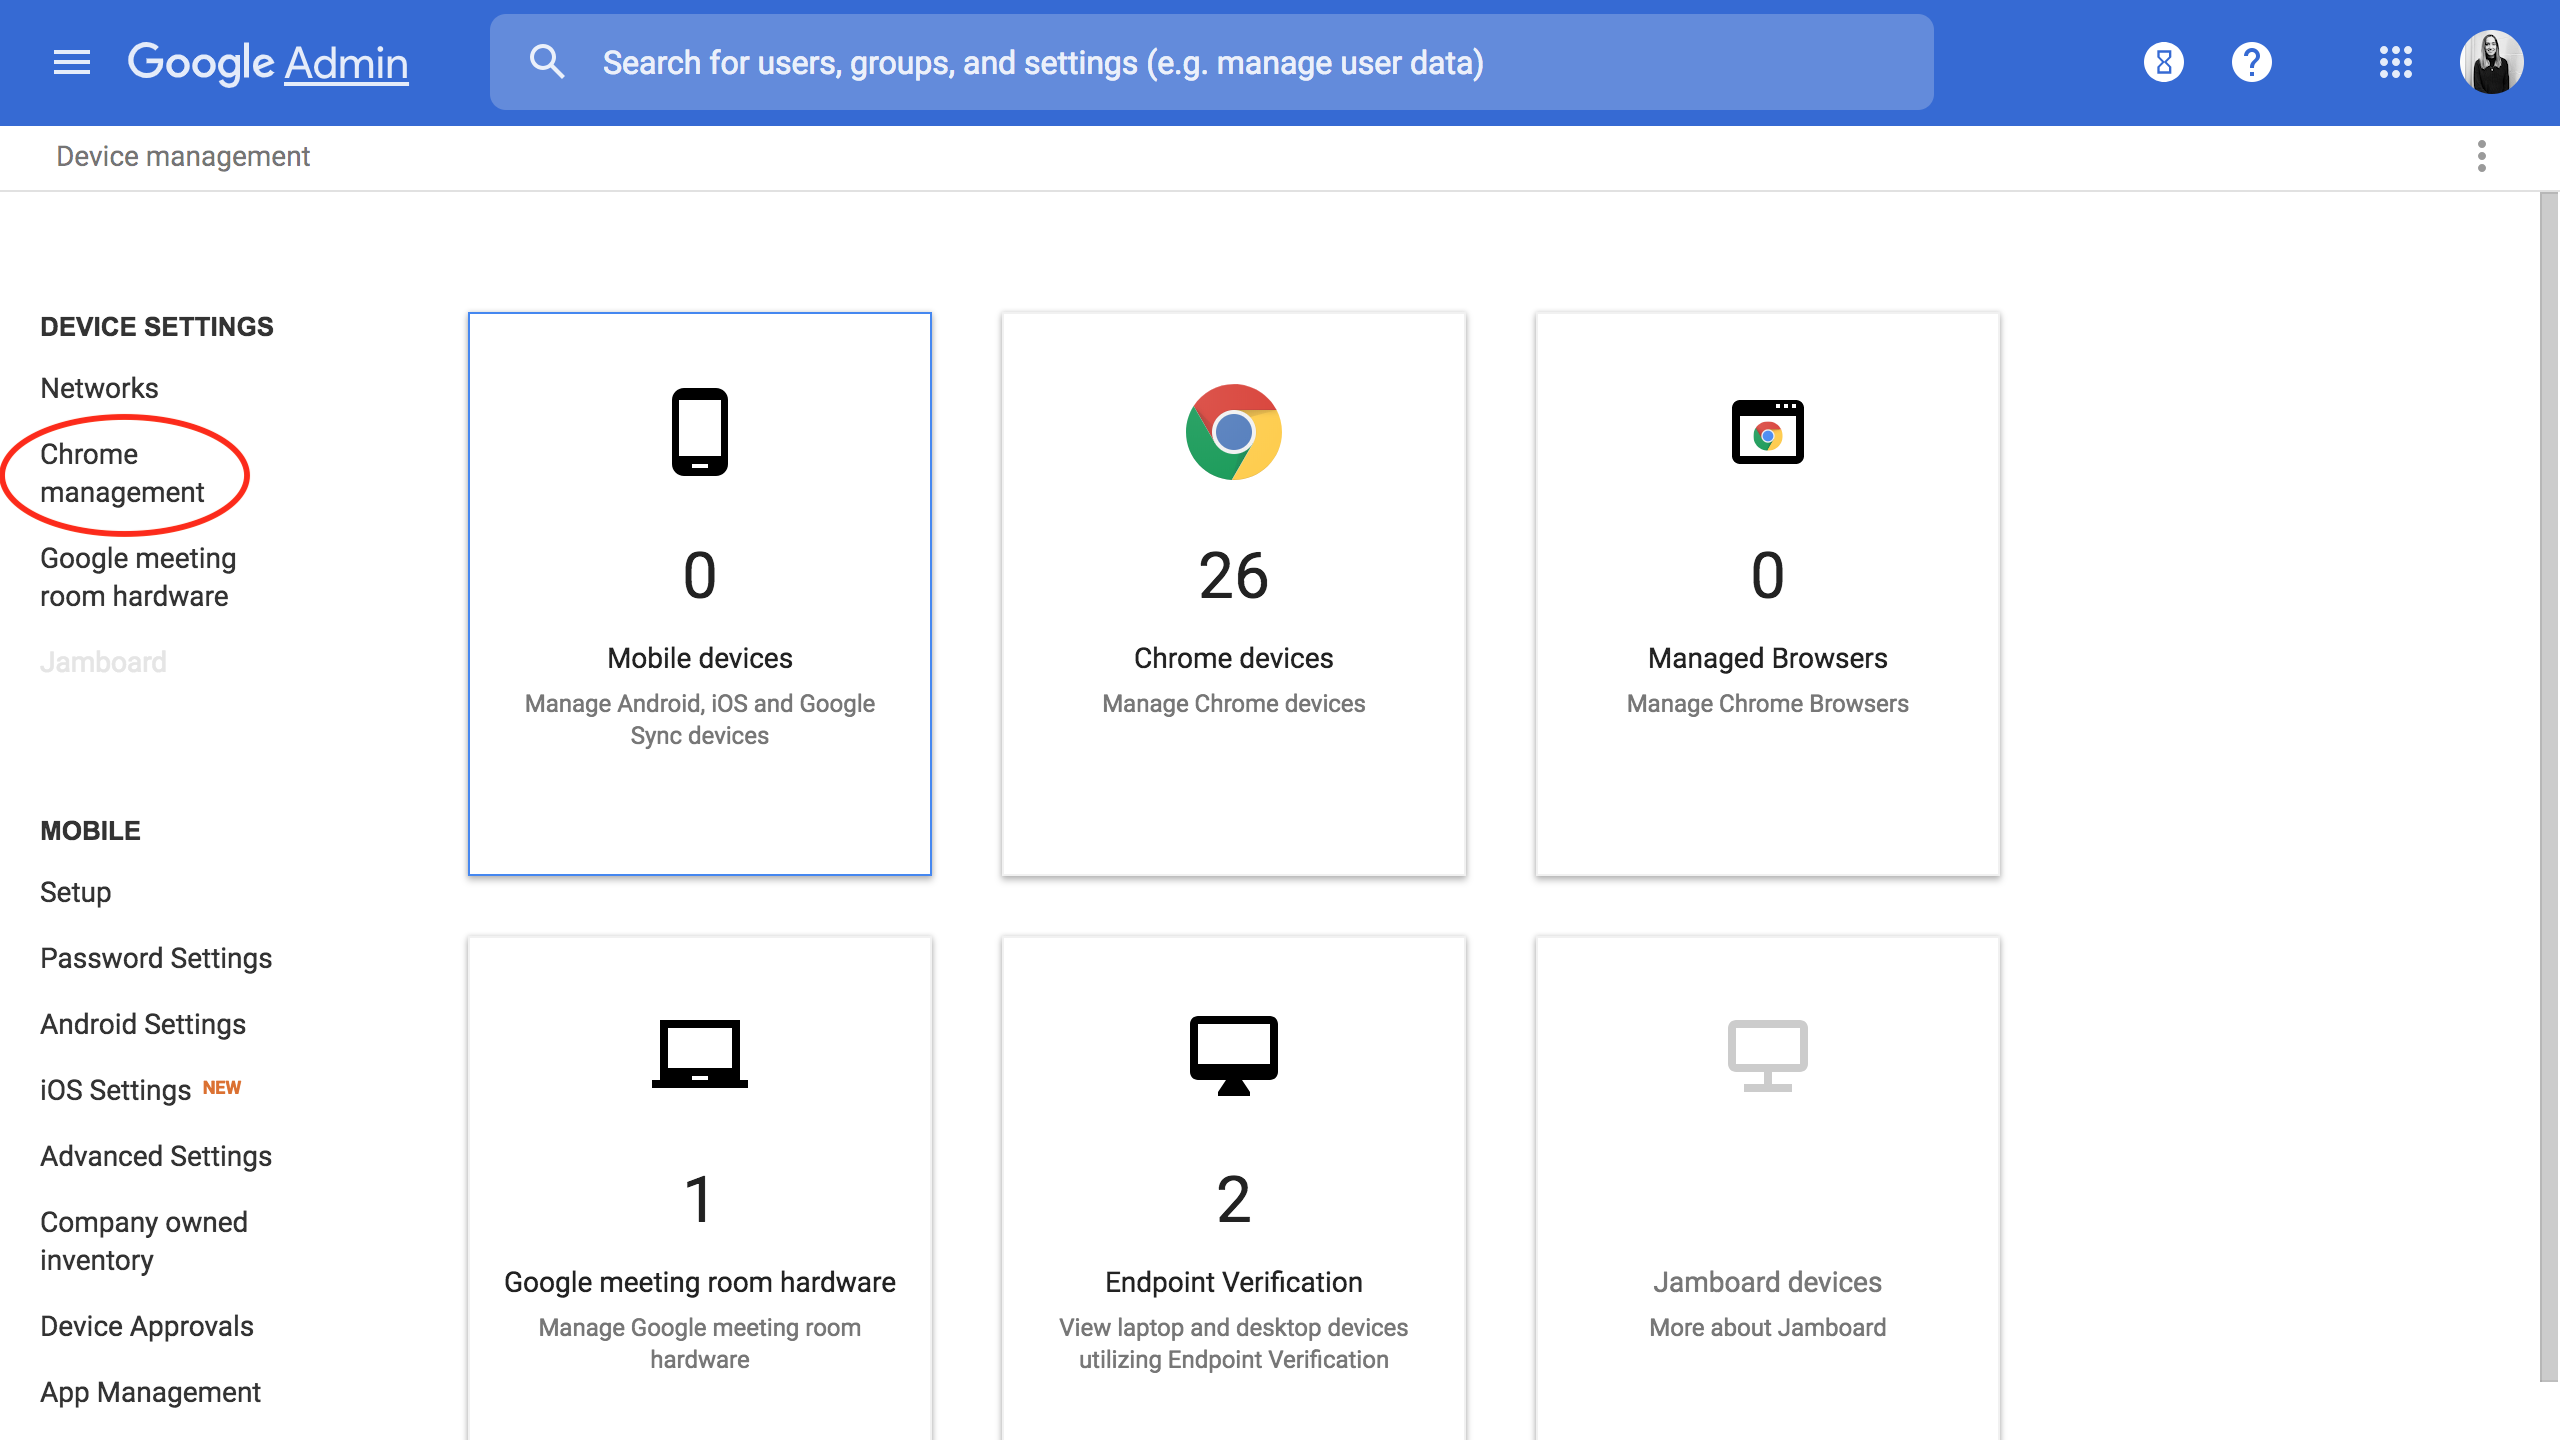
- Click
- Then, select
Chrome Management.
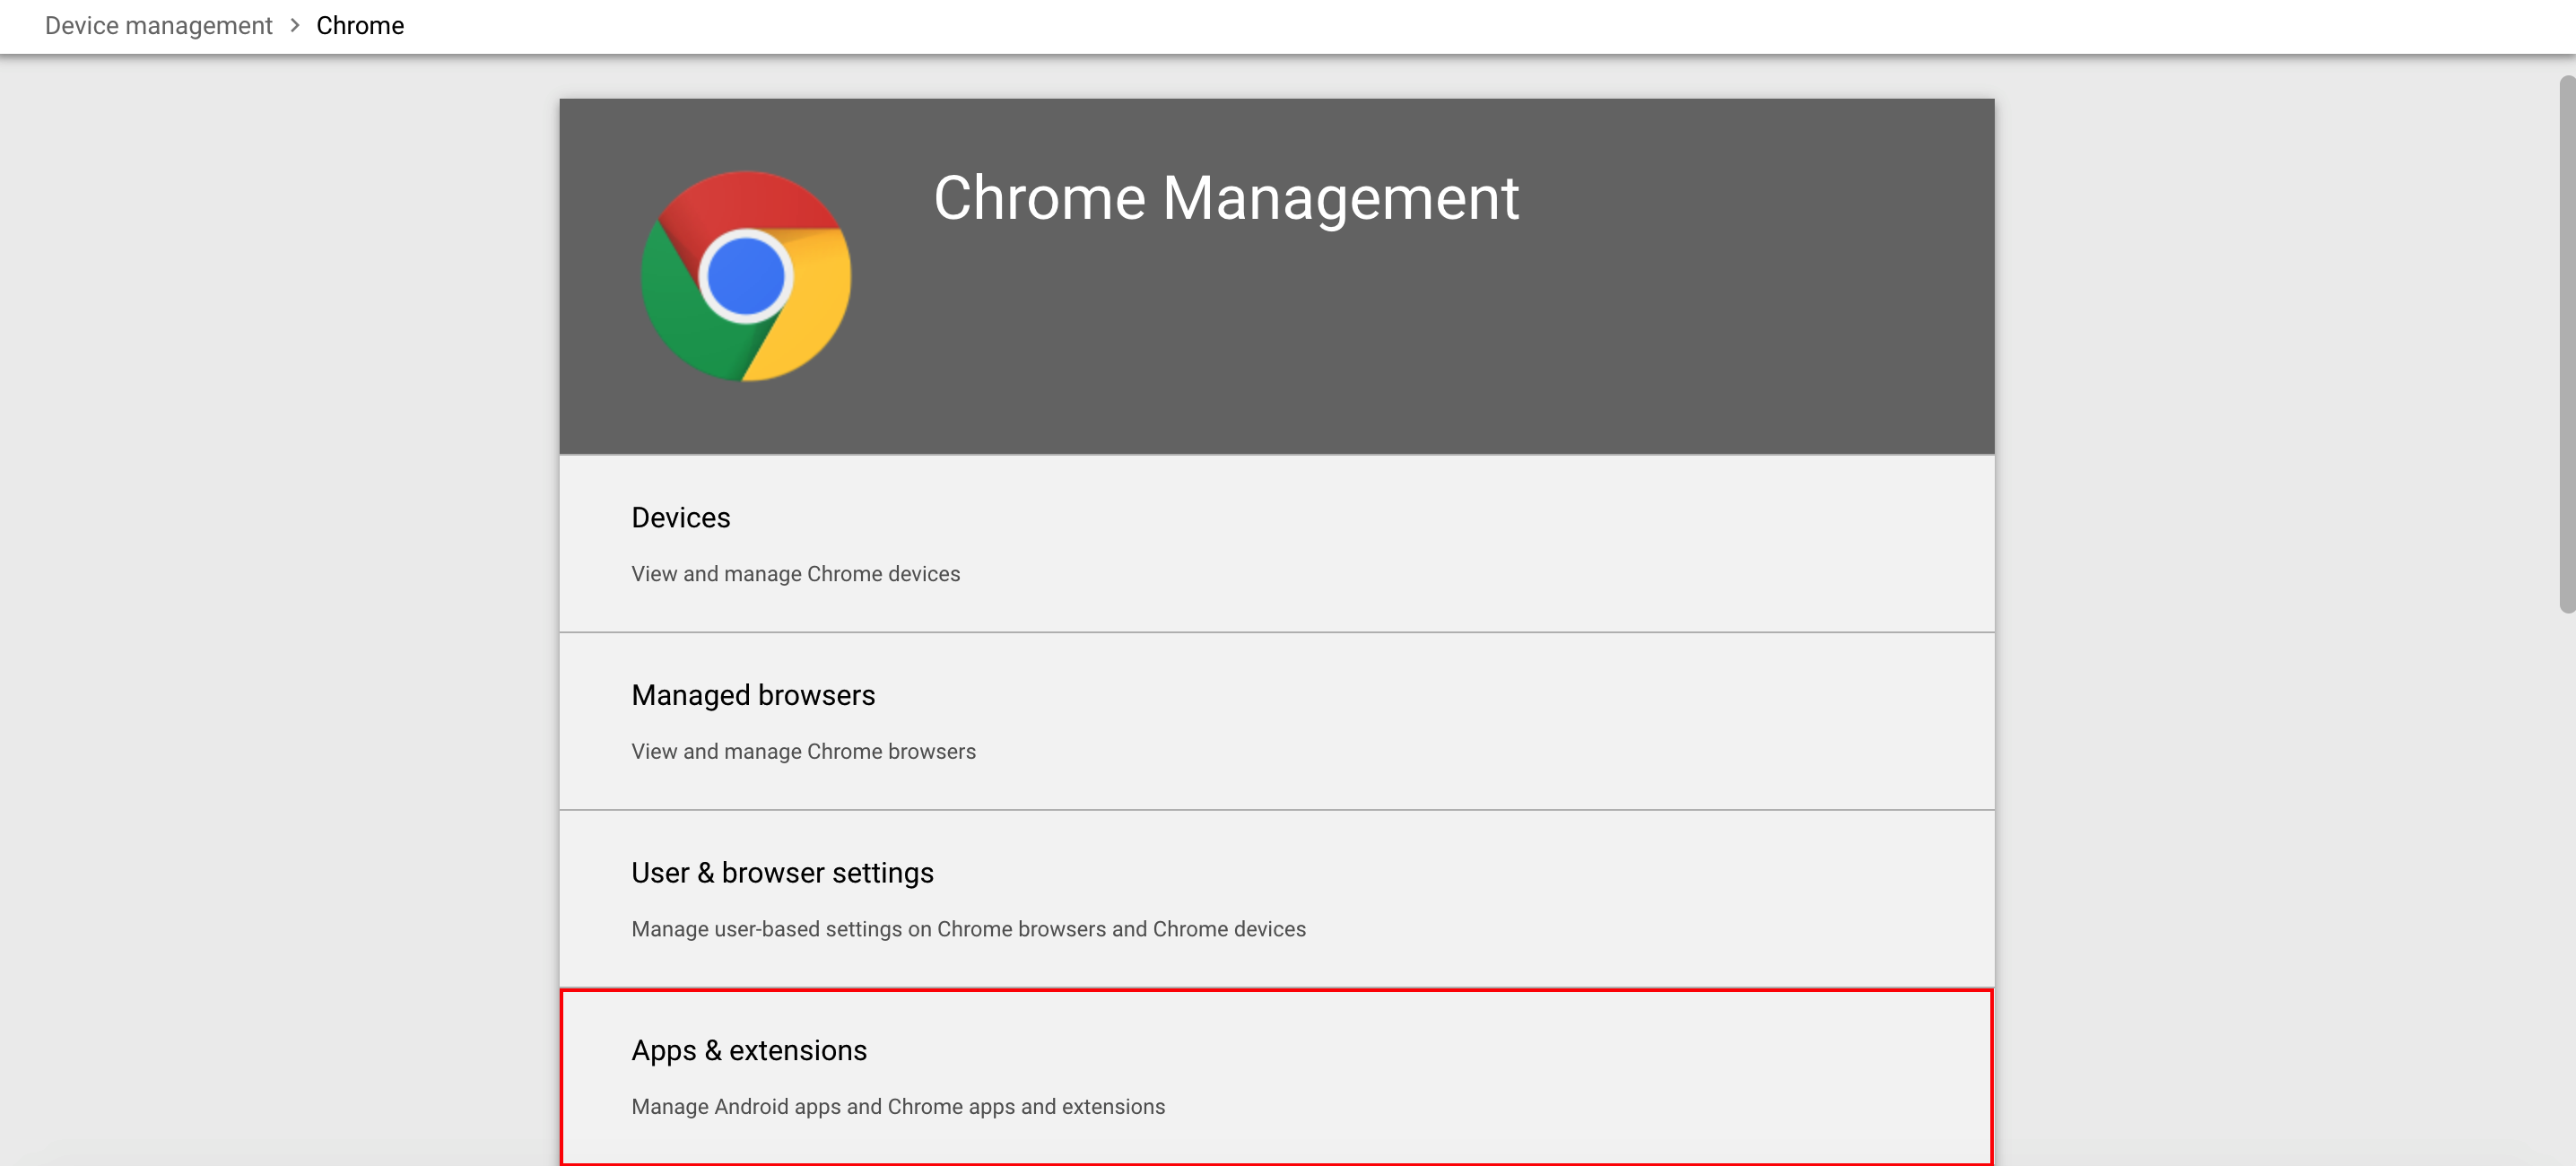
- Finally, go to
Apps & Extensions.
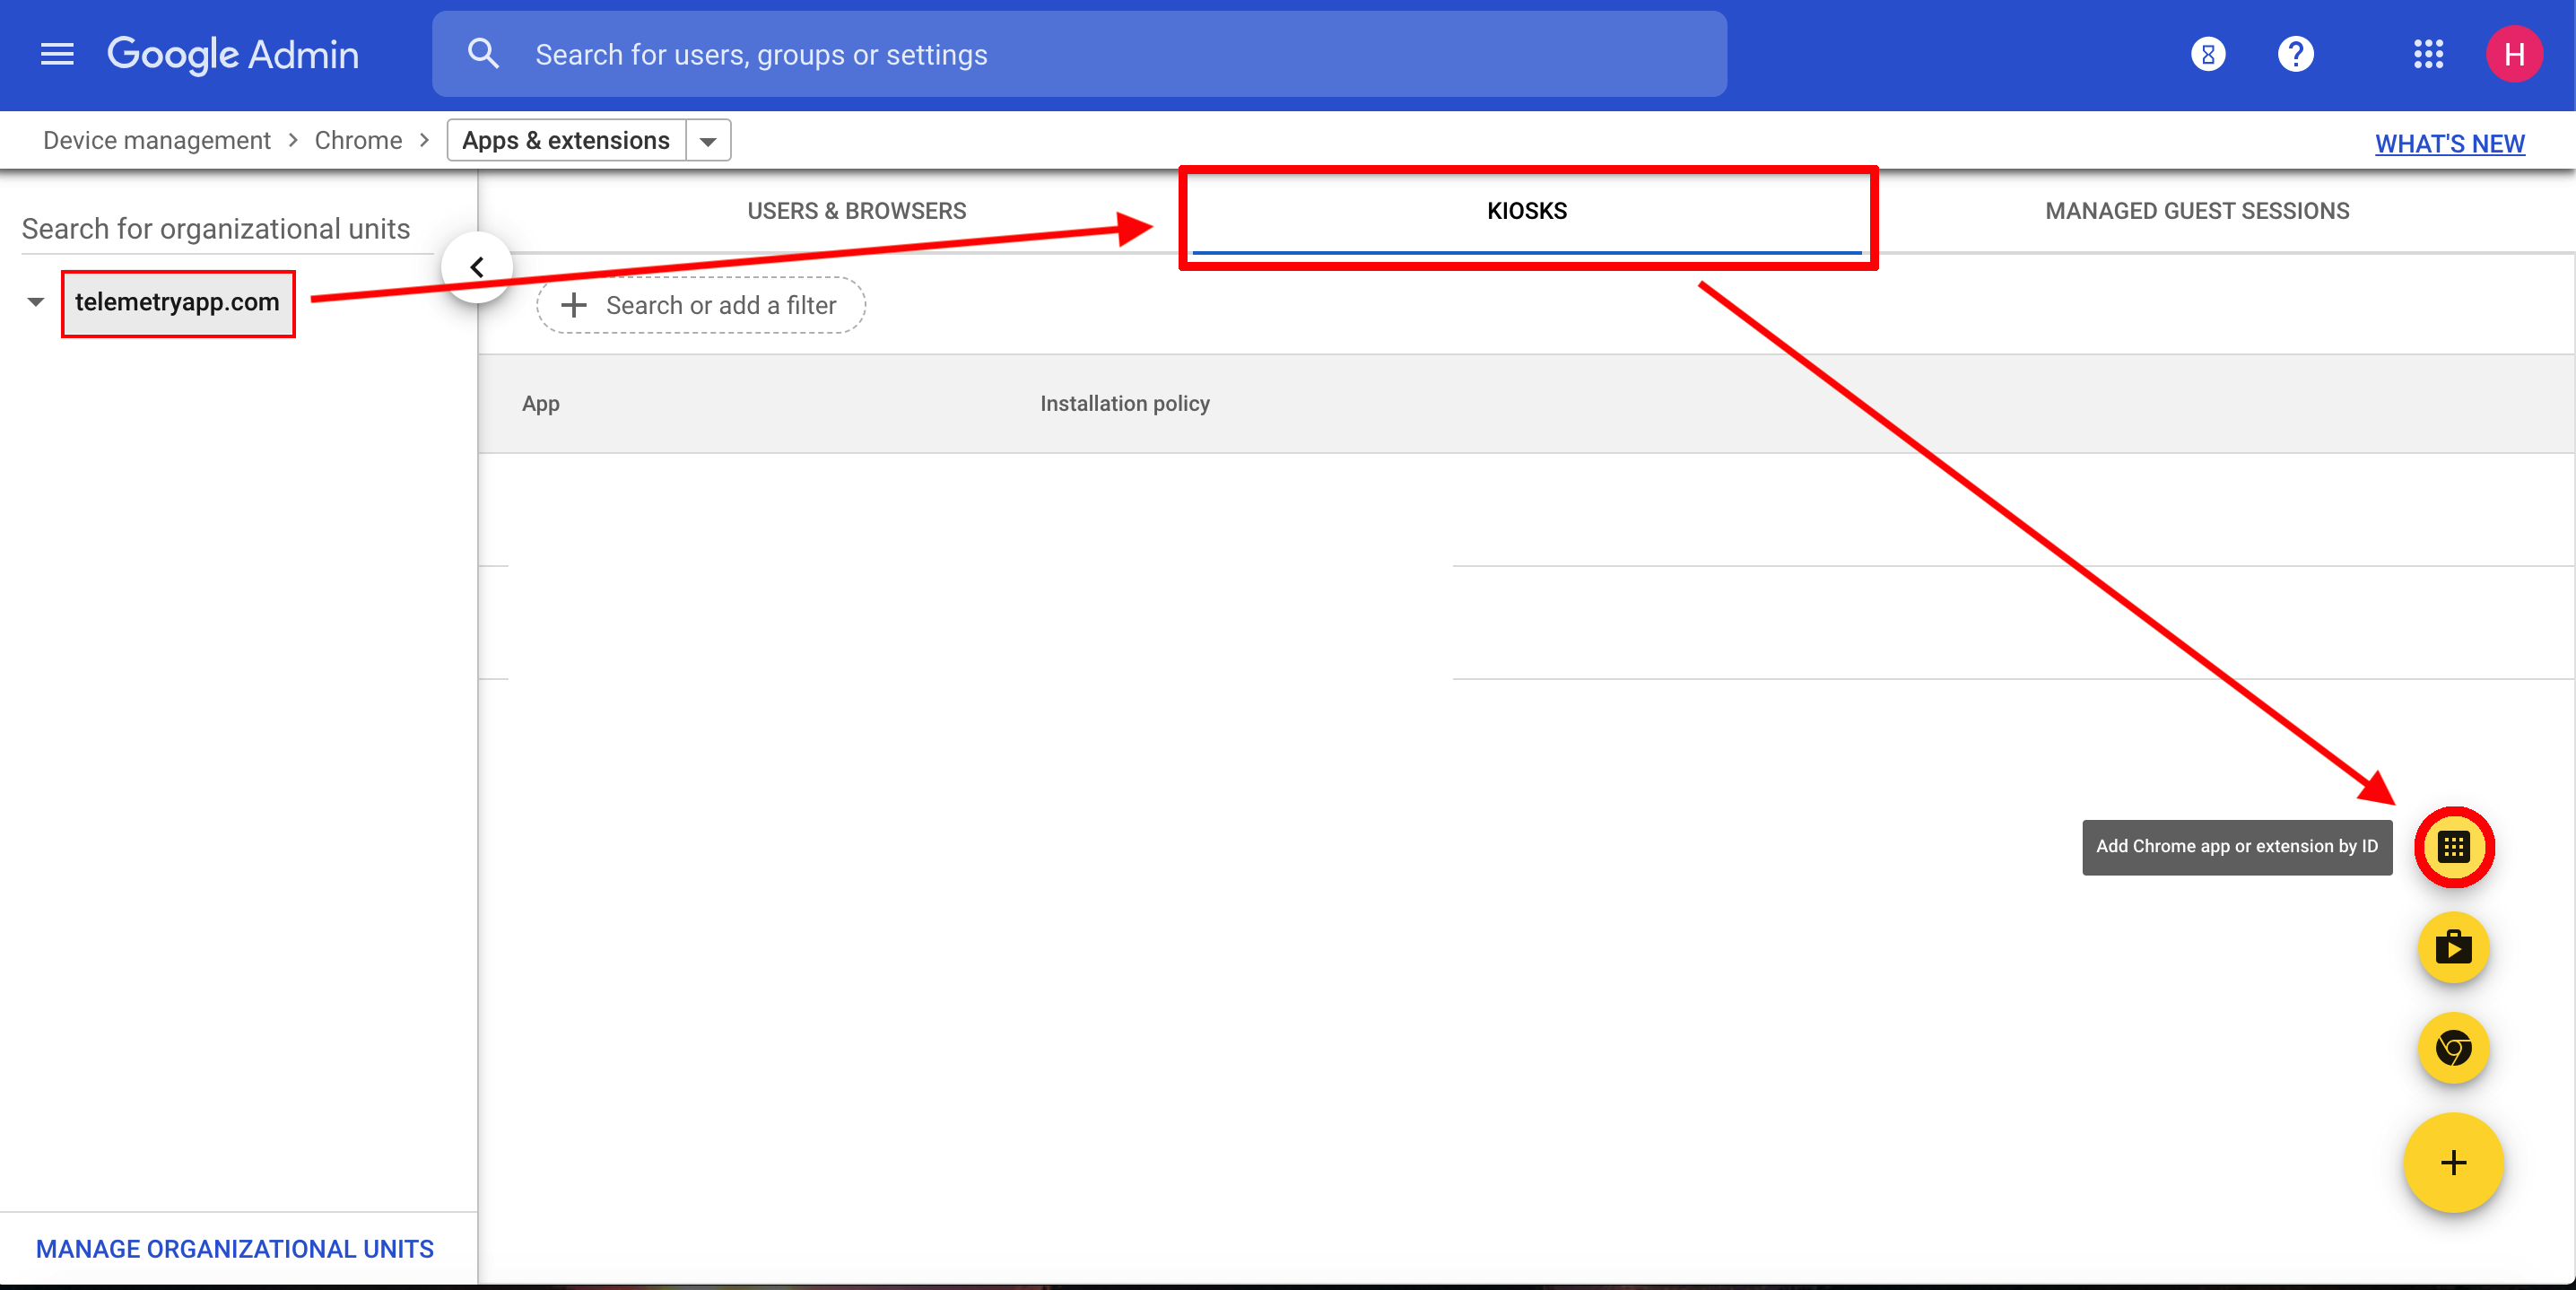
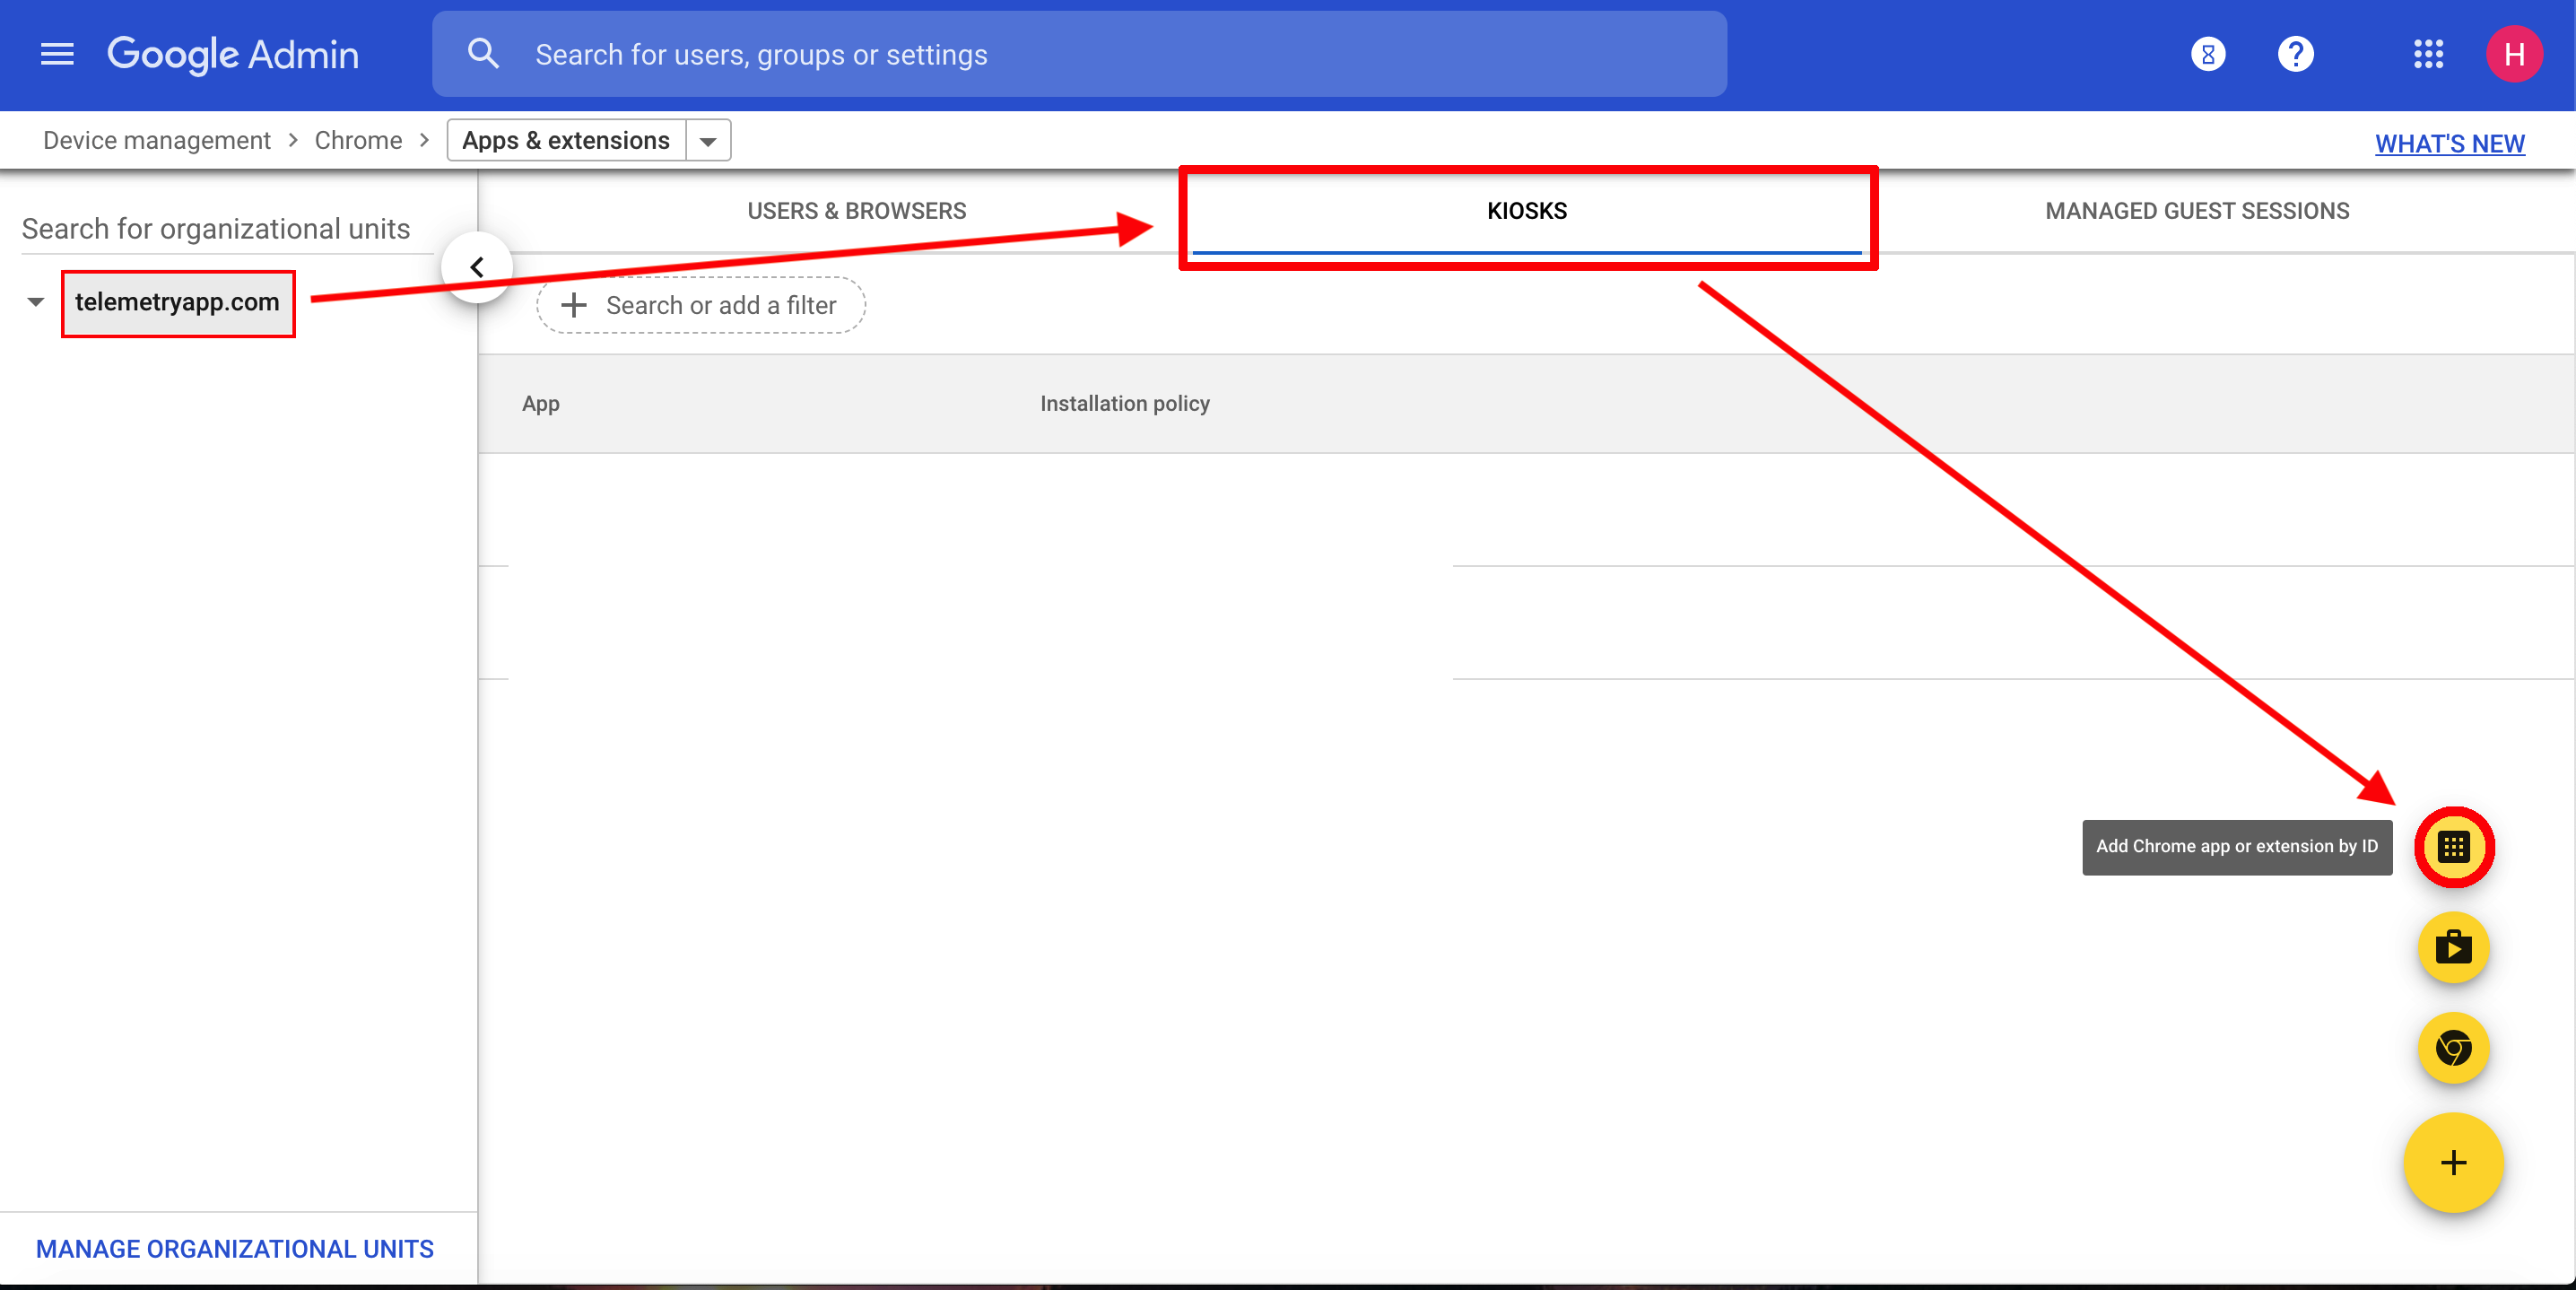
- Select Organizational Unit:
- Choose your Organizational Unit, then
Kiosks. - Click
Add Chrome app or extension by ID.
- Enter App ID:
- In the modal, select the "Chrome Web Store" tab.
- Enter this ID:
nnegimaehopiaikjnpdpokceckcbdoef. - Press
Enter. - Select
Addfor the TelemetryTV Media Player App, then clickSave.
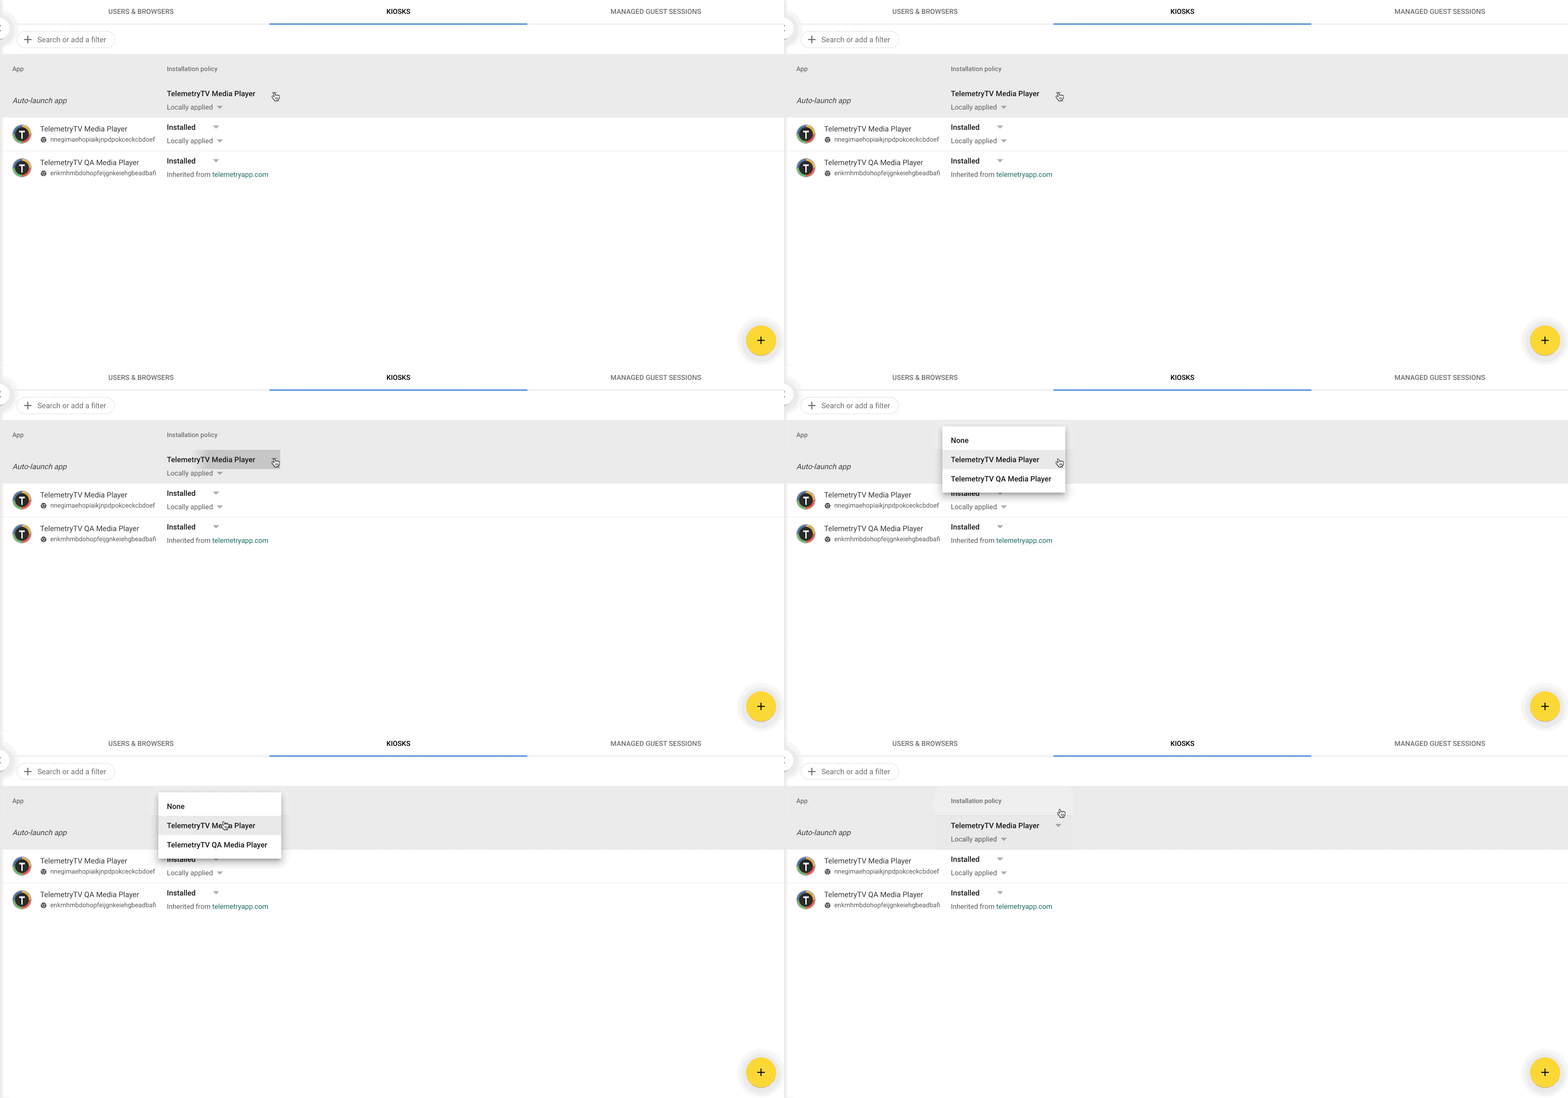
- Auto Launch Setting:
- In the same menu, set TelemetryTV Media Player as the
Auto Launch App.
2.2 Connect TelemetryTV Media Player to Your Account
- Log in to TelemetryTV: Access your TelemetryTV account.
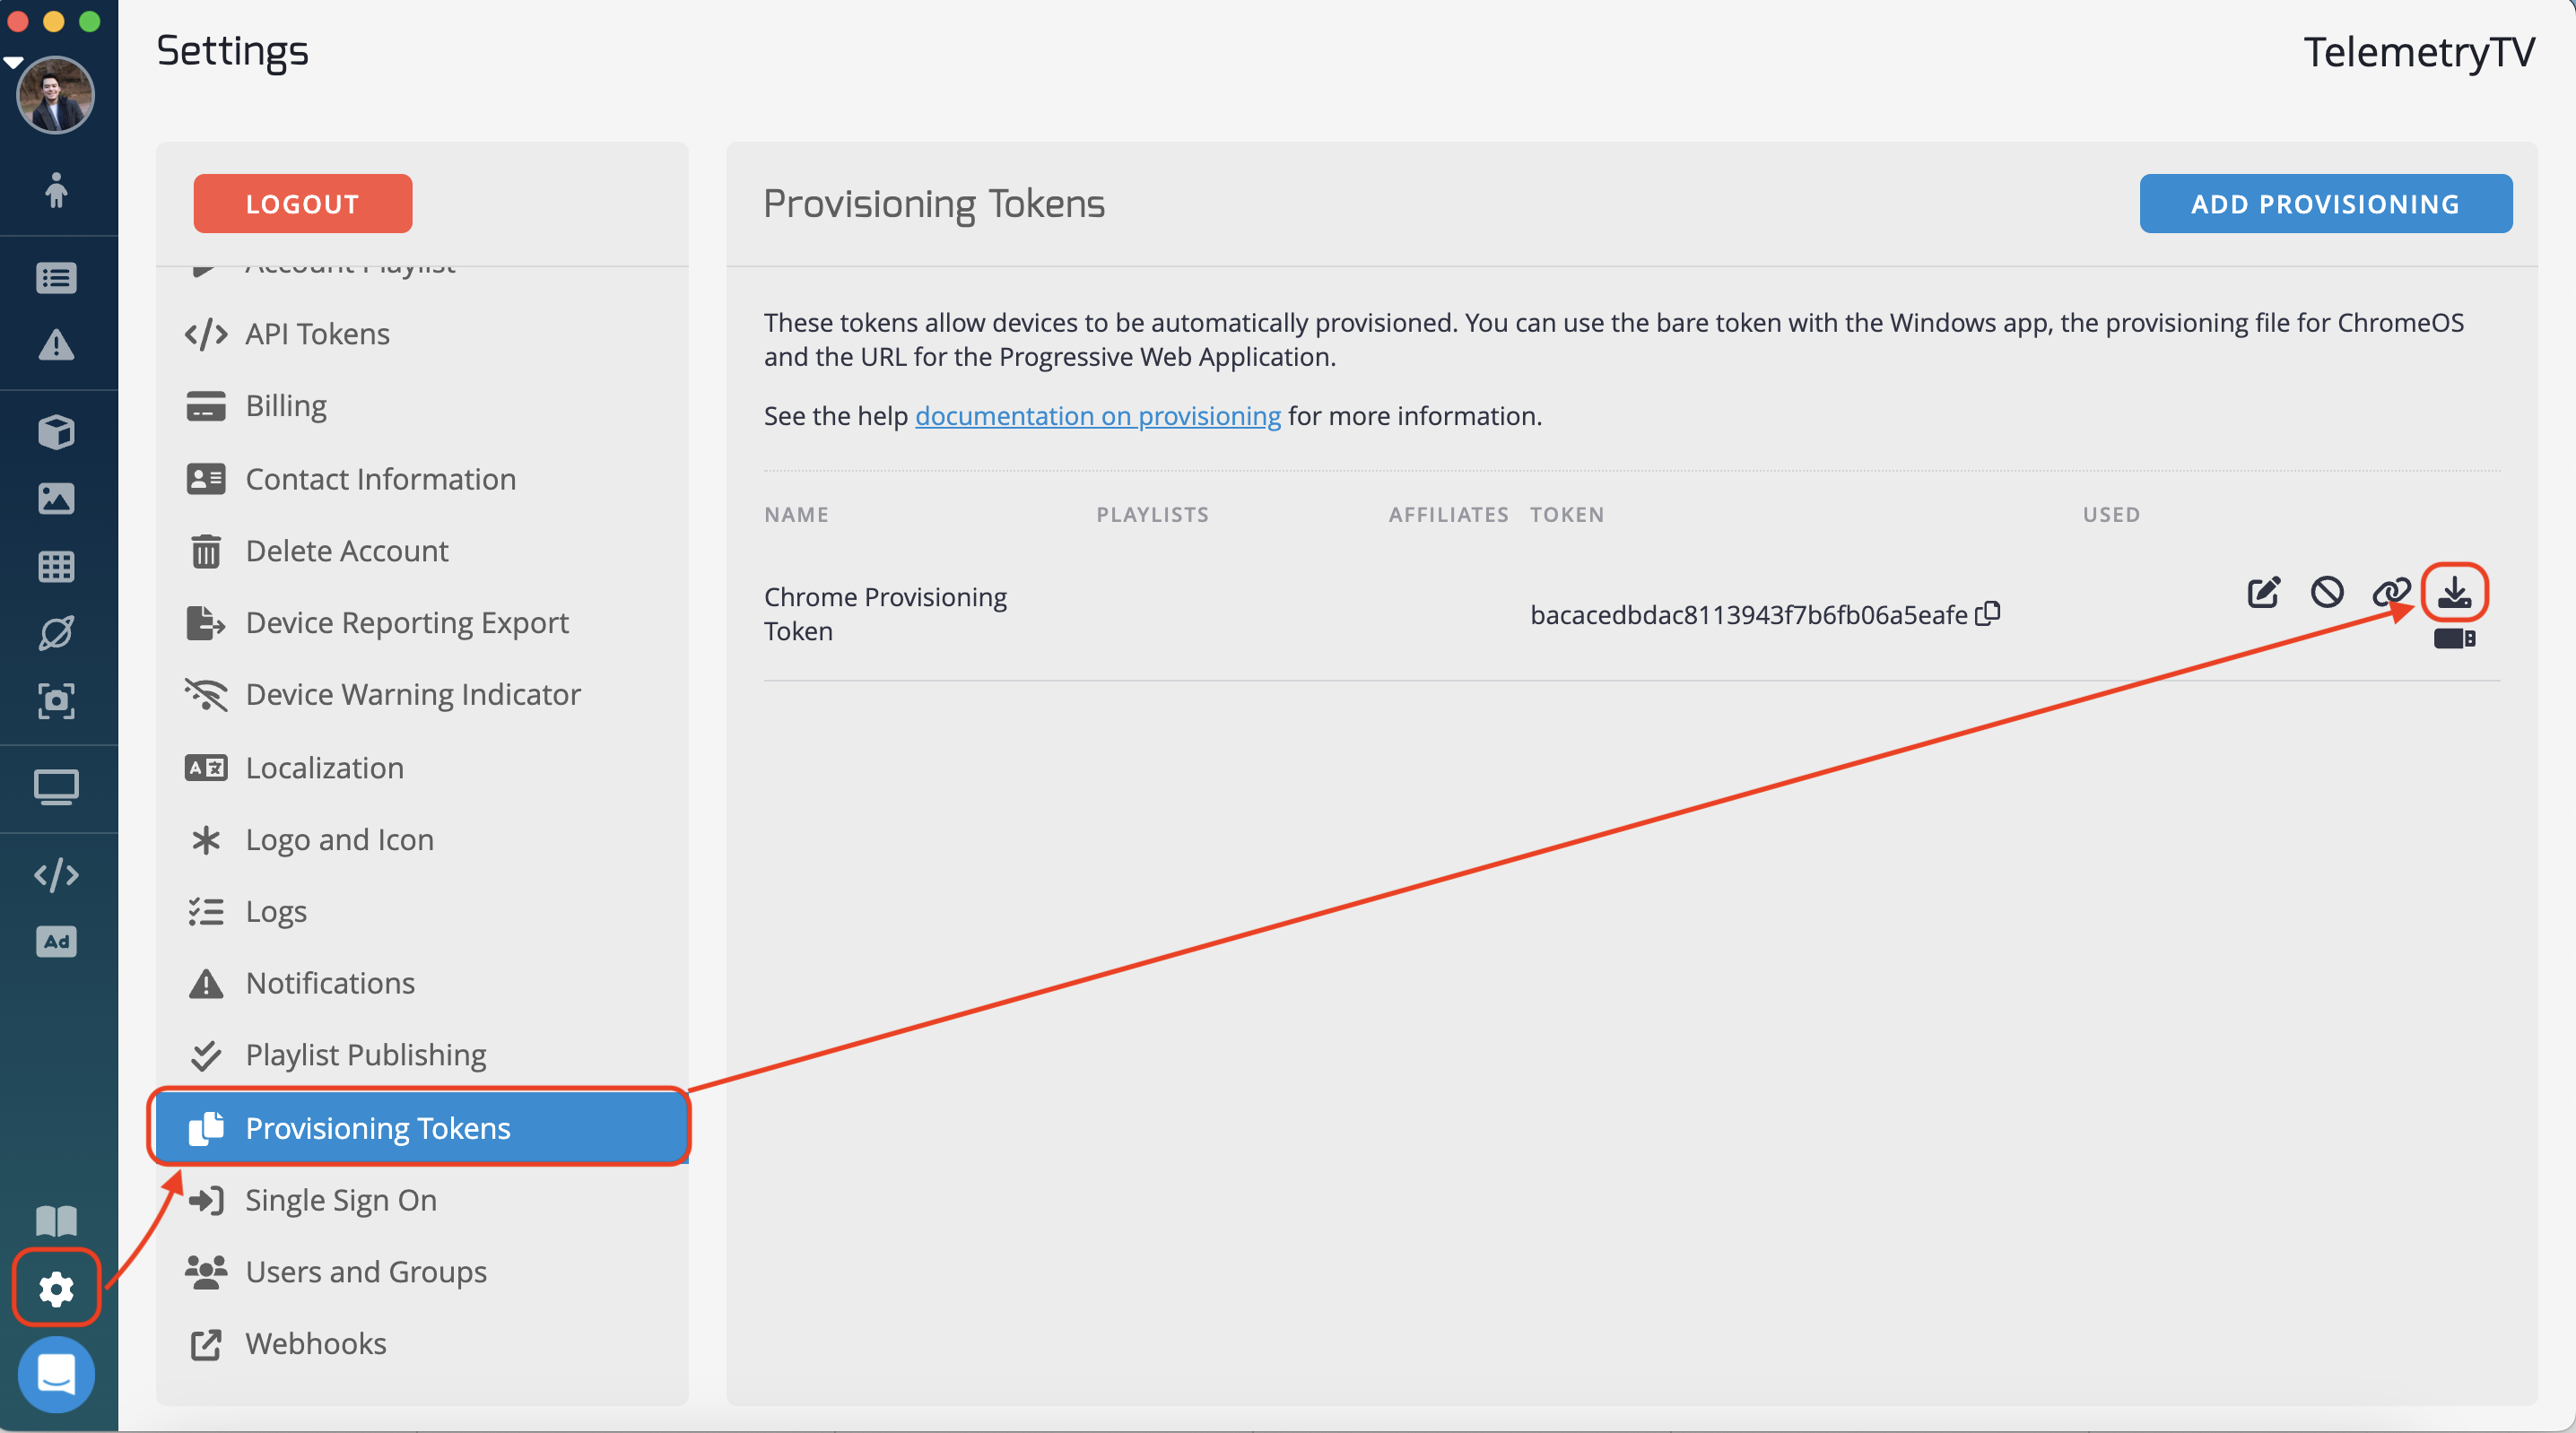
- Download Provisioning File:
- In the TelemetryTV web app, go to the
Settingspage. - Click the
Provisionbutton on theDevicespage. - Download the provisioning file by clicking the designated icon.
- In the TelemetryTV web app, go to the
- Paste Configuration:
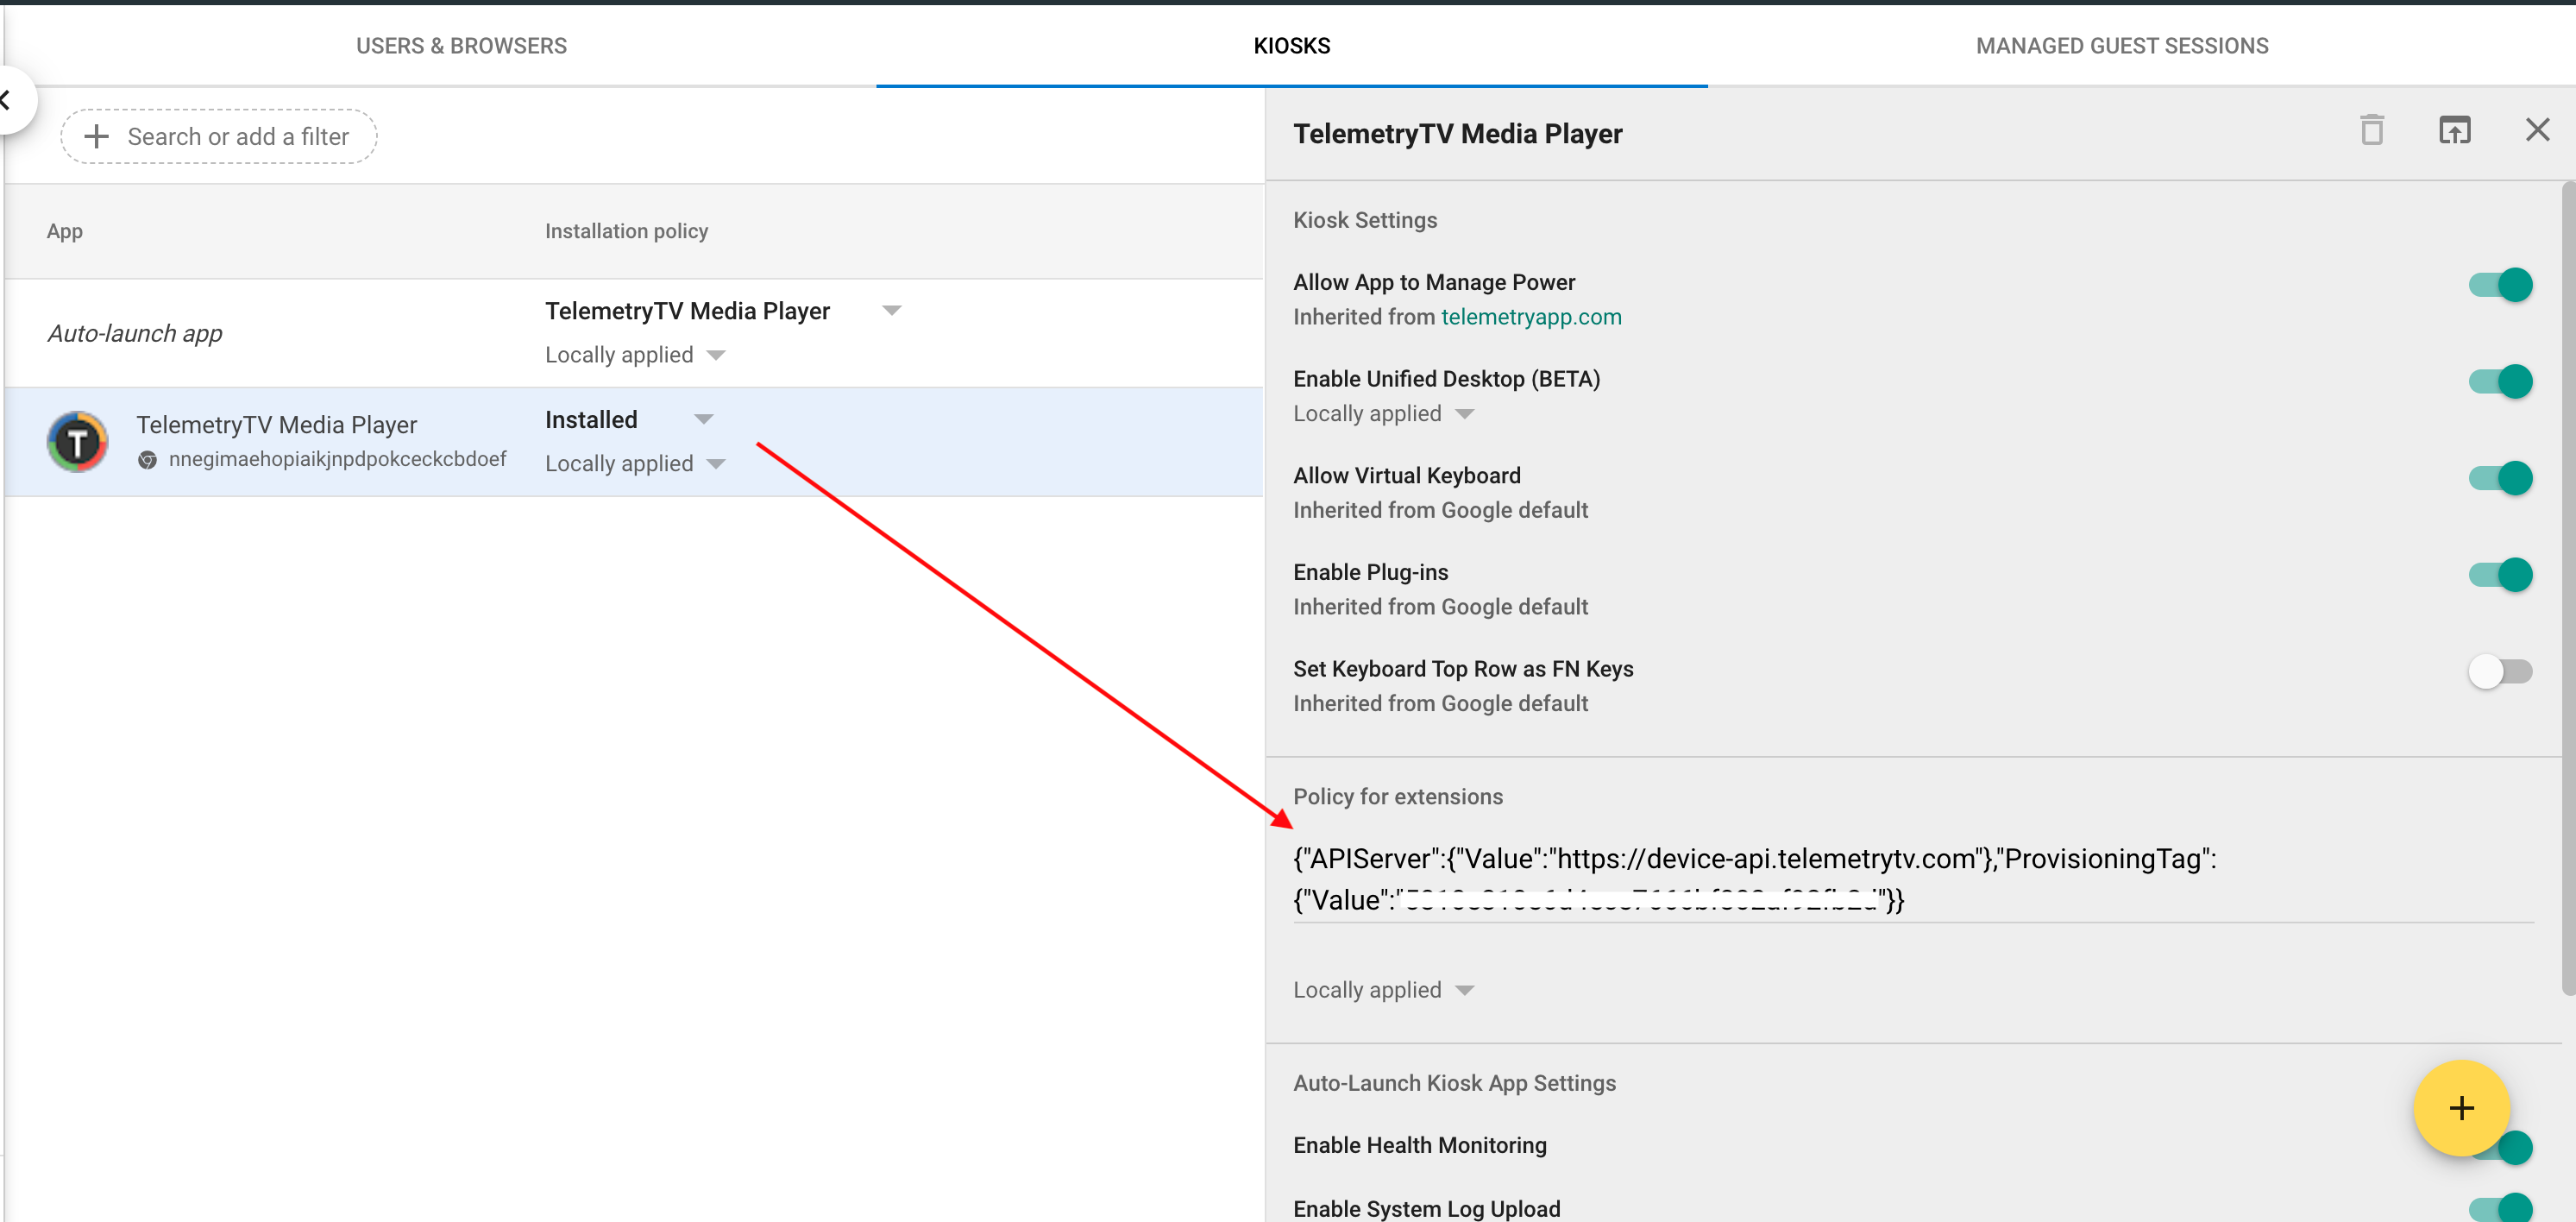
- Return to
Device Management -> Chrome -> Apps & Extensionsin Google Admin. - Open the downloaded .JSON file and copy its content.
- Click on TelemetryTV Media Player in the app settings.
- Paste the content under "Policy for Extensions."
PART 3: Synchronizing Google CDM with TelemetryTV
3.1 Set Up a New Project in Google APIs Console
- Access Google APIs Console: Visit the Google APIs Console.
- Create a New Project:
- Click "Create Project".
- Name your project (e.g., "Digital Signage" or "TelemetryTV").
- Click
Create.
- Enable Admin SDK:
- Once your project is created, search for "Admin SDK".
- Navigate to the Admin SDK page.
- With your project selected, enable Admin SDK.
Sync Your Google CDM Organizations to TelemetryTVOptional Step: This syncs your organizations from Google Admin to TelemetryTV, helping you organize devices efficiently.
Congratulations on setting up Single App Kiosk Mode in Google Admin! You're now ready for seamless content display and management across multiple screens.
Updated 2 months ago
What’s Next